Showing posts with label designer lampwork beads. Show all posts

Tuesday, February 3, 2015

Will I ever get back to shed/studio/shed?


So, it has been a long time since I have been in the shed/studio/shed making beads and I have to say I am slightly nervous about switching on that torch again.  I have been incredibly busy over the last year and had to put the beads on hold … but I have really missed disappearing out to my shed and making a few glassy creations.  


I sat down with my daughter the other evening and we sat at the kitchen table making earrings together and it set off so many ideas … oh the beads I could make …. I spent the weekend out in shed/studio/shed cleaning out all the spiders and preparing my work space ready for action.


The first bead I will make is one of my signature implosion beads and then who knows where the inspiration will take me.  Should I set to work with a colour scheme in mind or just go with the flow?  I don't know …. I shall melt the glass, let it flow and see what happens.  One thing I do know is that it will be great to get back out there!

Sarah xx

Wednesday, January 1, 2014

HAPPY NEW YEAR!


Hello, I feel as though I have been away for too long … and I have.  I think I should also explain why. I haven't stopped making lampwork beads but have had a little break for the last three months because I have been so busy.

As many of you know I started making lampwork beads as a hobby that has grown into a small business.  I enjoy every minute of making beads but now my children are all at school I needed to get my career back on track.  So as well as making beads I am doing a Masters in Volcanology.  This isn't as strange as it may sound because I am a Geologist and the principles of melting glass have many analogies to molten lava.  One of my assignments was to write a Wikipedia page so I wrote about  Pele's Tears  These are tiny beads of molten glass that are ejected during lava fountaining.  So I am managing to get beads in to my course as well ….. Sorry …. but all of my posts from now on will probably have something about volcanoes in them ….

Anyway I am waffling again … I have just finished the taught part of the course which was extremely interesting but also very time consuming so this is the main reason why I have been absent from my blog.  But I am back now to share more beads, tutorials and advice.  

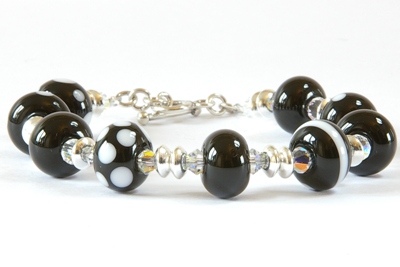
So what has been happening in the world of beads?  I was asked to make a bracelet using the Chess bead set above.  The lady wanted the bracelet to look very similar to the arrangement in the photograph.  I had to add more beads to the set but kept the design very simple by only adding plain black beads.  Unfortunately, I didn't take a photograph of the finished set but the lady was very pleased with the result.


I was also very sad to say goodbye to this set of beads.  I had been secretly hoping that they wouldn't sell (which doesn't make me a very good sales person I know!) because they were one of my favourite sets and marked the transition to my own unique style and design.  However, they did go to a very good home.  What about you?  Do you have any bead sets that you are reluctant to let go?  I am terrible for it.  I have a box full of sets that I really need to add to Etsy and sell but I just can't bring myself to part with them.

I will be back soon, I promise with some photos of jewellery made using my beads by some of my very lovely customers.

Speak soon

Sarah xx

Wednesday, May 8, 2013

Emerald City!

I write blog posts about each individual bead set to help promote my lampwork beads (obviously) but also to help keep a record of the beads I have made and the inspiration behind each set of beads.  It is also great when the beads have sold because they will be immortalised within this blog.  I can peruse at my leisure and remember the beads I have made, look at how my style has improved and changed and remember the moments that led to the development of each individual bead. 
 
 
I can't really make the same set of beads again because each bead is an individual entity but I can look back when I have one of those moments when the creativity won't flow and sometimes gain inspiration from a set of beads that I have already made.  This is what happened with this set of beads.  I was sat in my shed listening to the musical "Wicked" and looking through my bead when my hand suddenly rested upon a rod of Emerald glass.  Why not try this style of beads in Emerald?
 
It is a gorgeous colour.  Such a deep intense green, I will definitely be using this colour again.  This style of beads is a welcome release really to the precision of making implosion beads.  I have a few more lampwork bead sets like this to share with you but now that summer is coming I can sense a change in my style .....
 
This bead set is available to purchase in my shop on Etsy.  If you click on a photograph a link will take you straight there.
 
Sarah xx
 

Tuesday, April 9, 2013

Amber Shock!

It was one of my friend's 40th birthday last weekend and I wanted to make her something special.  It is a very special birthday after all!  I am always admiring her hair because she is very lucky to be able to dye it fantastic colours.  Usually amber/red/orange colours.  When I think of her, this is the first thing that springs to mind.  The colour amber.  I spent a lot of time thinking about what to make her and what colours to use.  Then I remembered this lampwork bead set.  I made these beads last year and was about to re-list them but changed my mind because they had all the right combination of colours .... lots of amber to bring out the colour of her hair, a contrasting colour of vibrant teal and ivory to tone the bright colours down a little ..... not too much though .... 
 
 
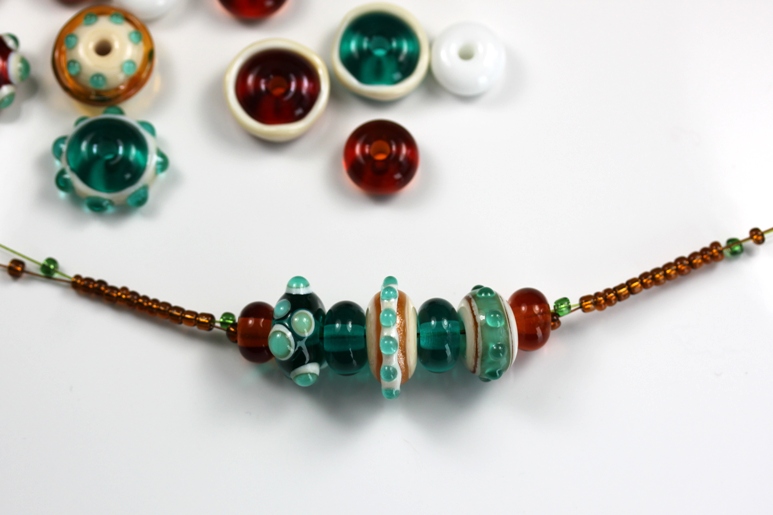
As you can see from this photograph I had an interesting set of beads to work with.  Different shapes, styles and colours.  The trick is how to put all of these together to make a beautiful piece of jewellery.  What did I do?  I am going to tell you right now ......


I had a search through all of my jewellery making materials as you can see from the photograph above.  I wanted the main theme of the necklace to be centered around the colour amber (My friends hair colour) with accent and contrasting colours of teal and ivory.  So, I needed thread, seed beads and extra lampwork beads to match.


I started with the largest lampwork bead.  This is going to act as the focus of my necklace (the centerpiece).  I have placed a plain teal coloured bead either side of my focal bead.  The teal colour will help to bring out the colours within this bead.  Either side of these beads I have placed a couple of decorated lampwork beads and finished this group off with a couple of clear amber coloured beads.


I decided to double strand these beads (you will see why in a minute).  I used an equal length of olive and brown tigertail.  I placed the beads in the center of the two stands and built my necklace from this point.


I needed a method to keep my beads in place, which is one of the reason I used two strands of tigertail.  I placed an emerald coloured seed bead onto the olive tigertail and a brown coloured seed bead onto the brown tigertail.  To lock these in place I then placed a brown seed bead through both strands of tigertail.


As you can see from the photograph, the seed beads make a pretty cluster either side of the lampwork beads and have the effect of locking the beads in place so they don't move up and down the strands of tigertail. 


I built the necklace up from this central point.  Making sure I added the same amount of beads to each side.  I should also mention that to keep the lampwork beads in place I placed the rest of the seed beads though both strands of tigertail. 


I continued to build up the necklace and used the seed beads to lock my lampwork beads in place.  I made a couple more clusters using the decorated lampwork beads separated by seed beads until the necklace was of the desired length.  I made a long necklace because my friend is tall and very slim and I thought it would look great on her.  A great deal of thought goes into my designs especially when I am designing a peice of jewellery or making a bead for someone in particular.
 
 
I couldn't decide at first if I was going to use a lobster clasp or a toggle clasp.  I decided on the toggle in the end because it suited the style of the necklace. 
 
 
I was so carried away with finishing the necklace that I didn't take any photographs of this part of the process .... sorry!  But, I have explained this in more detail in another blog post - Making your own jewellery!
 
 
Lovingly finished with a toggle clasp!  But, what does the finished necklace look like?


I wanted to show you how you can take a set of my lampwork beads, combine them with other materials to create a beautiful piece of jewellery.  I also hope this blog post inspires you to start making jewellery, even if it is for yourself.  It is a lovely hobby and it gives you the opportunity to make your own unique jewellery.  Items that no-one else will be wearing and that people will compliment every time you wear it.
 

So, to finish ... what would you make with this set of beads?  If you are a regular reader of my blog then you will already know that I am a lampwork artist and make all of the lampwork beads featured in my blog posts.  I make them all using my own hands in my studio.  All of my beads are made to a very high standard.  They are all kiln annealed to ensure long lasting life and durability.  I also clean the beads thoroughly to remove all traced of bead release.  If you would like to see more of my work then you are most welcome to visit my shop on Etsy - Beadscrumptious on Etsy!
 
Sarah xx


Thursday, April 4, 2013

Elise - Lampwork Glass Beads.

I am finally having a summer moment, even though the weather is still freezing cold and showing no sign of spring!  Here we have bright, hot pink and turquoise to brighten up any jewellery design.  It is a great colour combination that could form the basis of a beautiful piece of jewellery or "wearable art". 

 How did I make these beads? .... for any future lampworkers out there .....

Glass Used :

Effetre Dark Turquoise 591236
Effetre Teal 591056
Effetre Soft White 591208
CIM Heffalump 511645
CIM Cranberry Pink

Ok, I used Dark Turquoise and Heffalump as the base colours.  I then added a strip of Cranberry Pink on top of the Heffalump and a strip of Teal on top of the Dark Turquoise.  I melted the transparent glass into the base bead to create the effect you can see in the photograph.  The white glass was used to create the pretty little flowers that you can see on each bead.

Creating the flowers is very easy .... Add three blobs (very technical term) of white in a triangle on the surface of each strip.  Melt these in.  Then push a sharp pointy tool (another technical term) into the centre of each flower (gently).  Re-heat the flowers and the bead carefully to maintain the shape of the bead and to ensure the hole that you created closes over.  You should be left with a pretty little flower.


I will add pictures to this blog post next time I make a bead with little white flowers.  It is true, a picture paints a thousend words but I hope that this will be ok for now.

This is a very pretty set of lampwork beads ... but then I would say that and do quite often.  But I was seriously contemplating keeping this set of beads for myself (and will probably make myself a set next week). The colours are rich, vibrant and full of promise that we will have a beautiful summer in Britain this year!

I would also like to mention that whilst I was writing this post I had an audience of three stray chickens .... quite surreal and slightly wierd as they were not mine!  They just decided to wander up to my garden and sit with me in my shed/studio/shed all afternoon.  They are now wandering across the field to their real home for the night ....

Sarah xx
www.beadscrumptious.co.uk
www.hypersmash.com


Tuesday, April 2, 2013

English Country Garden!

Quite by chance I stumbled upon making a floral bead with flowers that look like a Pansy.  It would be dishonest of me to say I had planned to make these flowers because it isn't true.  It was one of those moments (I have many of these) where I thought "I wonder what would happen if I ..... " and the result was a floral bead of Pansy petals.

 
These beads are composed of many layers to give the flowers some interest and depth.  I started by creating a central core of clear glass that was wrapped in frit and pixie dust.  The dust gives the beads an inner sparkle.  On top of this layer I added a swirling layer of cane to mimic the swirling foliage around the flowers.  I covered this in another layer of glass and created the petals on top.  When the petals were all melted into the glass and the trapped bubble created in the centre I then encased the whole bead in clear glass.

I know I harp on a bit about the pucker around the bead hole but all of my beads have a beautiful dimple surrounding the bead hole and the encasing layer of glass flows all the way to the beading hole.  I spend a great amount of time ensuring the glass is a smooth continuous layer to the centre of the bead hole. 

 
I needed a garden in which my flowers could grow .... so I made one of signature floral implosion beads.  From this viewpoint the bead looks as though it is full of dense foliage and a mixture of grass. 


This bead set can be found in my shop on Etsy - Beadscrumptious

Sarah xx
www.beadscrumptious.co.uk
www.hypersmash.com


Friday, March 29, 2013

Galactic Storm!

 
I am so excited! I don't know if I should admit this but I am a serious Doctor Who fan and my excitement (in a little kid waiting for Christmas ... kind of way) is because it will be back on our television screens tomorrow evening ... Yipeeeee!  Everything stops in my house for Doctor Who.  I have converted my children (even the cat comes in to watch it) and it has become a family tradition just like it was when I was a little girl.  Although I am sure it was more scary then! 
 
To celebrate this exciting moment in British television ... at least for me anyway!  I have decided to re-list this bead set on Etsy at a reduced price of £15.00 (original price £20.00).  Everyone is finding it difficult at the moment and I thought I would offer some reduced prices ... I suppose a sale really on a few selected items!
This is a beautiful set of beads because of the depth.  It is and will always be difficult to show this in a photograph but you could easily lose time just gazing into these beads.  There are black holes, interstellar clouds, trapped swirling galaxies and all kinds of phenomenon trapped within these beads.  It is as interesting as gazing up into the night sky on a very clear evening and losing yourself amongst the stars.    
 
A question I am asked many times ... "What could I make with them?" Well, where do I start?  For a simple but very striking necklace, they can be strung onto a sterling silver chain.  This is how I like to wear a lot of my beads because I can easily swap them around to create a different look.
 
 
Each one of these beads could be converted into a pendant and sold individually.  Or they could be doubled up as a pendant with a swirl of sterling silver at the bottom.  Very similar to the example shown below.  The sterling silver swirl would really compliment the galactic swirl theme and would look fantastic!  Actually why am I selling these beads?  I am giving myself some really good ideas here .....
 
 
These beads would make a beautiful bracelet surrounded by sterling silver saucer beads and swarovski crystals and maybe even a few dangling charms to represent planets or star shaped swarovski crystals ..... there are so many possibilities!
 
 
If you are feeling very artistic, you could really go to town and make a beautiful peice of "wearable art" around an intergalactic theme .... maybe I am now getting carried away but I think it would look great!


There are lots of options.  Even if you don't have any experience making jewellery you can use my beads to make a simple stunning necklace or you can use them to create something sensational!  A piece of art! It is all up to you .... although I would really love to see what you make with them!
 
Regrettably my beads are slightly expensive and there are many reasons for this.  I take a great amount of time perfecting my beads.  They take a long time to make because I very strongly believe in developing high quality beads.  Usually my beads are composed of many layers, encased many times and I always ensure this is to a very high standard.  All of my beads are kiln annealed which is a very important part of the lampwork process.  This gives the beads their lasting strength and durability.  I also spend a lot of time checking my beads for any imperfections, cleaning the beads and I always give them a little polish too. 
 
I should mention that it is very important to clean the bead holes after they have been kiln annealed to remove any traces of bead release.  This is a nasty substance that you don't really want to be breathing in so I ensure this is removed from all of my beads.  All of these steps take time and you can be assured that when you purchase my beads, you are spending money on a high quality item.
 
 If you click on a photograph of these beads it will take you straight to my shop on Etsy.
 
Sarah xx

Hypersmash.com