


Introduction
The inspiration for these Shrooms came from sitting opposite a local cartoonist at a craft fair who had made lots of beautiful cards some of which contained little red mushrooms. I started wondering if it would be possible to make one out of glass and during the quiet moments I started writing out a method.
The next day I sat at my torch and made my first attempt at a little Shroom and have never looked back. I have made them in many different colours, added dots to the cap, flowers to the stem and have had so much fun just playing around with whimsical ideas. I haven’t finished yet either..... following on from my Enchanted Tree Beads I want to make a series of Enchanted Shrooms as well. http://beadscrumptious.blogspot.co.uk/2012/04/enchanted-tree-beads.html
They make beautiful pendants, earrings and little charms that can be added to bracelets and necklaces. I hope you have fun with this tutorial.
Supplies
1 Rod Effetre Dark Ivory
1 Rod Effetre White
1 Rod Reichenbach Mystic Red
2mm Mandrel dipped in bead release
1 Rod Effetre White
1 Rod Reichenbach Mystic Red
2mm Mandrel dipped in bead release
Lampwork torch and Oxycon
Kiln
Protective Glasses with didymium lenses
1. We are going to start by making the stem of the Shroom. I have chosen Effetre Dark Ivory because I like the way it reacts with the flame giving a very organic look to the Shroom. Using your chosen colour, make a small barrel shaped bead. Don’t worry about making it look too neat and tidy at this stage.

2. When the bead is the desired size, warm the bead in the flame and then gently roll on a marver. This will elongate the barrel shape slightly.

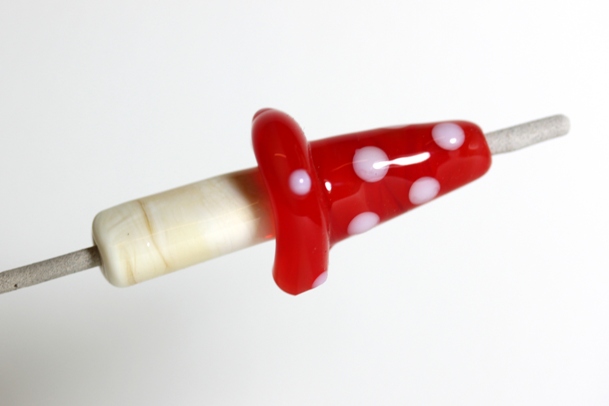
3. Choose a colour for the cap of the Shroom. In this tutorial I have chosen red but you can choose any colour you wish. Add a barrel of red to one end of the ivory as shown in the picture. Keep adding enough glass so that it is wider than the Ivory barrel.

4. Gently warm the red glass in the flame and holding the mandrel at an angle gently marver the tip of the bead. This is to create the triangular shape of the cap.

5. Now we want to widen the base of the cap. It is really up to you how much glass you add and depends entirely on what you want your Shroom to look like. Experiment! Using your red glass, add a ring around the base of the cap where it joins with the ivory glass. Carefully keep heating this area and adding more glass until you are happy with the shape of your Shroom.


7. Very carefully heat the tip of a white stringer in the flame until you have a small ball of glass. Add this to the cap of your Shroom and continue adding as many or a little dots as you choose.


2. When the bead is the desired size, warm the bead in the flame and then gently roll on a marver. This will elongate the barrel shape slightly.

3. Choose a colour for the cap of the Shroom. In this tutorial I have chosen red but you can choose any colour you wish. Add a barrel of red to one end of the ivory as shown in the picture. Keep adding enough glass so that it is wider than the Ivory barrel.

4. Gently warm the red glass in the flame and holding the mandrel at an angle gently marver the tip of the bead. This is to create the triangular shape of the cap.

5. Now we want to widen the base of the cap. It is really up to you how much glass you add and depends entirely on what you want your Shroom to look like. Experiment! Using your red glass, add a ring around the base of the cap where it joins with the ivory glass. Carefully keep heating this area and adding more glass until you are happy with the shape of your Shroom.

6. Once you have the shape of your Shroom, you can then decorate it with dots....flowers...or anything you like... This is where your individuality and creativity can blossom. Remember whilst you are decorating your Shroom to keep flashing it in and out of the flame so that it doesn’t crack!

7. Very carefully heat the tip of a white stringer in the flame until you have a small ball of glass. Add this to the cap of your Shroom and continue adding as many or a little dots as you choose.

8. Re-shape your Shroom and tidy up the ends if necessary and pop it into your kiln to anneal. I hope you have fun with this tutorial and make some very unique Shrooms. I like to turn mine into fun little pendants but they would also make very pretty charms on bracelets and necklaces.
Sarah xx
You make it look so easy, I dread to think what sort of mess I would get into. They look very cute.
ReplyDeleteAhhh thank you. It is really easy, honestly!
ReplyDeleteSarah xx