Wednesday, July 25, 2012

Hectic Week!


It was completely manic last week with all the end of term activities for the kids but I still managed to squeeze in my earrings for Week 14.  I completely confused myself over what week it was too.  For some reason I had two entries for Week 8 ...... I am going bonkers!

I made the beads for these earrings quite a long time ago and had completely forgotton about them until the other day when I found them lurking at the bottom of my bead box.  I can remember why they ended up there.  To be honest, I wasn't sure what to make with them and if I really liked them.

This has happened quite a few times.  I have had an idea for a set of beads and made them but they haven't quite turned out as I had imagined.  Now, this doesn't mean that they aren't very nice beads but when I am in the 'creative zone' they end up being put to one side whilst I concentrate on getting the design exactly the same as the image in my head.

I always keep these bead sets because I know from experience that in a few months/weeks time, I will look at the beads and see them completely differently.  Or they will become the spark of inspiration for a piece of jewellery.

Sarah xx
HyperSmash

Wednesday, July 18, 2012

A Completed Necklace!


I love you to Pluto .... and back!

I wrote about the inspiration behind this pendant in my blog post I love you to Pluto .... and back!.  I also wrote that I would show you how I turned this pendant into a necklace.  So ...... here goes!

1  Gather all your materials and tools.


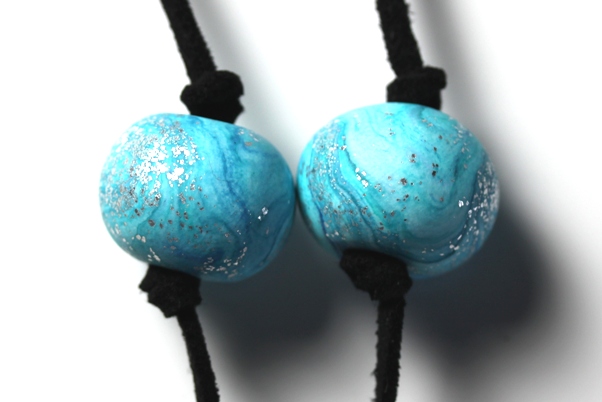
I wanted the pendant to be the focus of the necklace so I chose materials that would compliment the colours within the pendant.  I used a thick black suede as the stringing material and included some handmade blue beads to enhance the colours of Pluto.  Now, my intention was that the blue beads would represent planets in the solar system of my necklace.  To achieve this I made these beads using polymer clay mixed with acrylic paints, silver leaf and lots of swirling .... but I will leave this for another blog!

2  Stringing the pendant.


When I made the pendant I turned one of the craters into a stringing hole.  I had a fairly good idea how I was going to make the necklace before I started so I made sure the hole was fairly large. 

This pendant would look good as either a long or short necklace but I like mine long so I cut 19 inches of suede and strung it (equally) through the crater/hole.  I know, you are thinking ..... mmmmm that is a VERY long necklace but I needed to ensure I had enough stringing material for knotting.  It will all become very clear as you continue reading ......

I needed to give the pendant some stability before I strung on any beads so I tied a knot in the suede at the top of the pendant.

3  Stringing Beads!


I placed a knot in each thread at slightly different heights and threaded a bead onto each one.   I had two smaller beads and thought these would look really good as two orbiting moons! I didn't want them crashing into one another which is why I slightly offset them.  I placed a knot above each bead to keep them secure.  I don't want them whizzing off into outer space .....


I placed a knot in the same place on each thread because I wanted the next set of beads to be in exactly the same place on the necklace.  I threaded the beads and added another knot to keep them in place.  They look like this ....


I didn't want to stop here .... I added another set of beads on top and finished them with a knot so they looked like this .......


ooops .... after the photograph ..... I added the knots on top of the beads to stop them moving around on the thread.

I placed the next two knots (one on each thread) at an equal distance from the set above and added one bead on each thread.

4  Finishing the necklace.

I cut each thread so that they were exactly the same length.  I then took my cord ends (centre of the photograph) and placed one on each thread. 


Then, very gently (using my pliers) I squeezed the cord ends together to meet in the middle and trap the thread ..... see photos ......


5  Adding open jump rings!

When I first started making my own jewellery I had a lot of trouble with these tricky little blighters until I read all about them in a magazine.  My biggest mistake was to try and pull them apart to attach onto things like cord ends and I couldn't get them back together again without distorting the ring and leaving a huge gap.  Well, I now know there is an easy way ..... all you need to do to open them is grip each side of the jump ring either side of the opening and slide one side forward and one side back ....easy when you know how! To close, all you need to do is the reverse and they slide together without leaving a gap!

I attached a large junp ring onto one cord end and a smaller jump ring onto the other.  No, I haven't lost my marbles .... there is a method to my madness! 


I attached the trigger clasp to the smaller jump ring and used the larger jump ring to attach to .... like this ....


6  A finished Necklace!  ...... Hooray!


When I am at craft fairs a lot of people like my beads but don't really know what they can make with them or how to go about making jewellery so I hope I have given you a few ideas.  My future blog posts will have some more ideas on what you can make using my glass beads. 


I have also been asked what you could make using my Enchanted Tree Beads.  I am thinking about writing a tutorial to share a few of my own ideas.  Maybe my next blog post?

Sarah xx
Hypersmash.com

Sunday, July 15, 2012

Love Flies!

Week 12 - Love Flies
Hello,

I just wanted to write a quick blog to show you some of the earrings I have made as part of the 52 earrings in a year challenge!  In my next blog post I will show you how I made my Pluto pendant into a necklace ... I promise!

Here are a few more pairs of earrings that I haven't included in my blog posts so far .....


Week 10
I decided to have a break this week from polymer clay and make some earrings using my own lampwork beads.  


Week 9

I made my own flower cane for these earrings and I do have a half finished pendant to add as well.  I was really pleased with these, especially considering I am quite new to polymer clay.

Have a great week!   My next blog post will be coming soon ....

Sarah xx


Hyper Smash

Tuesday, July 10, 2012

I love you to the pluto .... and back!


I have been very busy over the last couple of weeks designing and making this pendant.  I have had the idea for a long time and I have to say I am really pleased with the result.  It looks exactly like I imagined it would ... which doesn't always happen, believe me!

Anyway .... where did this idea come from?


Source: amazon.co.uk via Sarah on Pinterest

When my eldest son was a toddler he used to love it when we read, Guess how much I love you by Sam McBratney.  It is a lovely story about a little Nutbrown Hare competing with Big Nutbrown Hare over how much they love each other.  On one of the pages little Nutbrown Hare opens his/her arms as wide as they will go and says "I love you this much" so big Nutbrown Hare opens his/her arms wider and says "I love you this much".  Little Nutbrown Hare replies with "hmm that is a lot" and so the story continues until little Nutbrown Hare says "I love you right up to the Moon!" and Big Nutbrown Hare says "AND BACK!".

So, one day I was reading this to my son and (typical of him) he says very smugly "Well, I love YOU to Pluto!".  You can guess what my answer was .... "Hmm that is a long way ... I love you to Pluto and BACK!"   This has always been our special joke and now he is growing up (too quickly), I wanted to capture that memory in a piece of jewellery.

I have tried before ... Last Christmas my husband bought me some Precious Metal Clay and I decided I would use the clay to make three silver charms that would remind me of my three children.  I started with this idea and made a silver pendant in the shape of a heart with "to Pluto" written on it.


Whilst I enjoyed making it, there was something missing.  It was far too plain and didn't represent all the fun and giggles we had with the story.  So, I put the idea to the back of my mind until a couple of weeks ago when I was sat doodling on a scrap of paper.  Suddenly the idea emerged into this design!


I hadn't thought of using polymer clay before and with a few tweeks to my original design the pendant took shape.  I know, just in case there are some planetary boffins out there that Pluto isn't really this colour but I think I can excuse myself and use my artistic licence to change things around a little.  I wanted the pendant to be bright, bold and lots of fun! 

I definitely think I have captured the memory for my son because when he saw the pendant (and I didn't say anything ...) his face filled up with an enormous beaming smile, he grabbed hold of me and gave me the biggest huggle EVER! There were no words!

I have been asked a few times, how to turn my beads into jewellery.  So,  in next weeks blog post I will show you (with lots of photos) how I have made this into a necklace ... or a piece of "wearable art" as Chrissie would say. 


My youngest son likes the story about Aliens in Underpants!  Not sure how I am going to do this one yet!

Ooops nearly forgot ... the earrings to match!


www.Hypersmash.com

Monday, July 2, 2012

Dreaming of a new Shed/Studio/Shed!


I have a lovely little Shed/Studio/Shed at the bottom of my garden but I can't help it, I need more space!  My lovely husband (he reads my blog), my very very lovely husband, the best husband in the world and I am so lucky to have married him .... (that should be enough , hee hee)  is working on a design for my new studio.  So I though I would give him a few ideas!!


I am very happy to go modern and have a bead shaped studio!


This one would go very well with my new chicken pen ...


My little chickens would love a larger version of this .....

Source: google.co.uk via Sarah on Pinterest
I think my favourite one would have to be the first tree house.  I only hope my lovely, wonderful and extremely clever husband does read this because lovely as this little house is .... I don't want one like this!
Sarah xx
Hyper Smash
Hypersmash.com