Showing posts with label lampwork glass bead blog. Show all posts

Monday, January 21, 2013

Monthly Make - January 2013


Many times I have recieved a compliment about my work followed by .... "...but what would I do with those beads?......"  So, I have decided to start a new monthly blog called the Monthly Make.  In  this I will challenge myself to find a way of using my beads .... This challenge will not include using my beads for jewellery but other ways in which my beads can be used!

Ok, so here goes ........

Felt Flower Brooches!

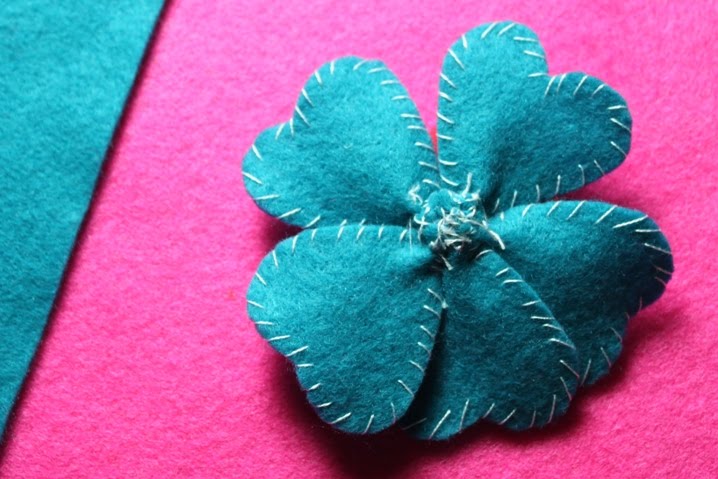
1.  Make yourself a card template in the shape of the petal that you would like. As it is coming up to Valentines day I decided to make a heart shaped petal but you could have round, oval, triangular or something more elaborate.  There are many, many options.  I also made a large and a small template for different sized petals. Then, using your templates cut out 5 large petals and 3 small petals (or as many as you would like).


2.  This is where you can let your creativity flow and decorate the edges of your petals, add sequins ... embroider flowers, make them as pretty as you like or just leave them plain and simple.  Both can be equally as effective!  I like to stitch around the outside of my petals in a contrasting colour.


3.  Once your petals are ready, it is time to construct the flower.  This bit can be a little fiddly .... or it may just be me!  You are trying to achieve a little pucker when you gather all the petals together.  The way I do this is to do a running stitch through the base of each petal and then carefully pull them all together into a bundle.  When I have them all arranged the way I want them, I securely stitch all the petals together.


4.  Repeat step 3 with the smaller petals. Then stitch these into the centre of the large flower.


5.  We are now in a position to decorate the centre of the flower.  I had a quick look through my bead box and found this very lonely purple lentil bead.  I like to clash my colours!  I stitched the bead into the centre of the flower.  The orientation of the bead will depend on the surface decoration.  I have used one of my implosion beads in the first photograph and I finished this off with a tiny seed bead to cover the bead hole.  I have placed the purple lentil bead on it's side so the bead hole isn't visible.


6.  Now, depending what you want to use your flowers for, you may/may not want to add a brooch pin.  I must confess that I am not a very neat sewer as you can see from the photograph below .... So, if I wasn't going to add a brooch pin I would hide this by gluing a red circle on the top using my glue gun.  If I was going to add a brooch pin I would sew it directly onto the flower.  I would then open the pin and attach a patch of felt over the back of the brooch pin.  It finishes the flower quite neatly!


I hope you enjoyed reading this post and if you have a go .... I would love to see your flowers!

Sarah xx
www.beadscrumptious.co.uk
www.hypersmash.com

Wednesday, January 16, 2013

2013 Here I come!

I spent last week working hard getting all my accounts ready and sorting out all of my tax.  I was quite surprised at the amount of glass I have accumulated over the last year and all the different colours I had stashed away.  Whilst I was doing a stock check I also decided to give my studio a good clean.  I don't think I have seen the surface of my desk for quite some time and now it is a shiny sparkling wonder of cleanliness. 
 
 
All of my tangled and untidy stringers (thinner bits of glass used for decorating the suface of beads) are all put away in any container I can find .... looking very messy but not on my nice clean desk.
 
 
I have an old plant pot full of sand from Exmouth Beach (I think) holding all my mandrels in place ... ready for action ....
 
 
Now I thought having a good clean and tidy would also bring lots of inspiration but it seems to have had the reverse effect!  Help!  I am starting 2013 with no ideas, an empty mind, a thoroughly clean studio .... have I cleaned too much?  Have I cleaned away all my inspiration? 
 
 
I always go back to my photos of Barcelona for inspiration .... but even they aren't  helping me this morning!  What to do when these moments occur?  Write a blog post about having a nice clean studio and a mind empty of all inspiration, hoping that something will occur as these words are being written.
 
I am waiting for a Eureka moment to occur within the synapses of my brain!  Apparently the human brain is estimated to have between 100 - 500 trillion synapses .... so something should be happening deep within my cerebral cortex very soon! ....... I hope ......
 
 
Sarah xx
 

Sunday, November 25, 2012

CRAFTfest is Here!


Ok thought I would write a short blog post to let you all know that CRAFTfest has now started!  There are over 250 stalls selling a range of handcrafted items so you don't need to look any further this Christmas.

You can sit back in the comfort of your own home and shop contentedly!  There are no crowds, no parking fees, no over stressed people to make your shopping experience unpleasant and you can have as many coffee's as you want without having to take out a second mortgage!  Enjoy shopping from the comfort of your armchair, desk, bed whatever ......

Support Handmade!

CRAFTfest!

Sarah xx


Friday, November 16, 2012

Musings about - Craft Fairs V Online Selling.


Over a year ago I made the decision to sell my work online rather than attending local craft fairs.  There were a few reasons for this.  I had payed quite a lot of money to attend various local craft fairs with the promise that they had been widely promoted and the crafts on display were all handmade.  Mmmm unfortunately, I found this was not always the case.  In face in the majority of instances it was a complete lie!
 
I spend a lot of time and put a lot of work into making lampwork beads and jewellery.  I pride myself on the quality of my work.  This is because of the time and effort I put into making them.  I have designed a database to price all of my work based on the raw materials that I use.  I take it all very seriously and I work very hard top produce good quality, handmade beads and jewellery.  This quite naturally leads onto the discussion about whether we should (as Artisans) add our time as a monetary figure onto our price tags.  I can't help wondering that if we did, would we price ourselves out of the market? 
 
There is a lot of preparation prior to attending a craft show.  You don't just turn up and lay your items out on the table for all to see.  You have to design your stall and think very carefully about the best way to display your items.  This involves a great deal of time and money.  Banners, business cards, packaging materials, stands, lighting ....the list goes on!  These all cost money and don't come cheap!  Not only that, there is a stall to pay for and these doesn't always come cheap either!
 
You then have to go through all the items you are going to sell, make sure they are all correctly priced and again displayed to look attractive to potential customers.  It is hard work!
 
I can't tell you how demoralising it is to set up your stall with all your lovely, beautiful handmade items to find just around the corner is a stall selling cheap imports!  This wouldn't be a problem if you had been told from the start that actually most of the stalls were not promoting handmade items because then you proabably wouldn't have bothered to go! 
 
I haven't even touched upon the promotion of craft fairs.  I have attended a few in my time where I have put my heart and soul into setting up my stall to look beautiful for a handful of people to turn up because the event was poorly advertised!
 
I don't mean to be negative because I have attended some very well run craft fairs and have been very successful but you do have to be careful.  Definitely pick and choose the best ones!  That said, ocasionally I will still attend a local craft fair to support local charities but primarily I have chosen to sell online.
 
Before you think Eureka!  Selling online is the answer to all my problems and I will be a millionaire overnight with my fantastic website .... beware!  It is equally hard work because all the self promotion comes down to you but it is also fascinating and lots of fun!   I really enjoy this side of my work.  I have learnt so much about social networking, how the internet works, the power of social media.....the list goes on.  The great thing about it is that it is dynamic and changing all the time.  The trick that I haven't learnt yet is how to keep ahead of it all.  A challenge! I like it!

Now, where am I going with all of this.... Well one of the places I decided to sell my work online was Wow Thank you!  I choose this site because they invest a great deal of time and money advertising thier site and drawing people in to view your products.  This doesn't mean you can sit back and be lazy, there is still a lot of promotional work you need to do yourself but everything helps! 
 
When I joined Wow Thank You,  I was offered a place on the next CRAFTfest.  That sounds interesting I thought to myself!  A friend of mine had already mentioned the idea to me so I knew a little bit about it before I was signed up.  Basically it is a virtual, online craft fair!  The best of both worlds!  
 
It takes a bit of work to set up your stall but again you join a team of people and in the run up to the CRAFTfest you each help promote the event.  I think this year there are over 200 stalls.  That is 200 people advertising an event, through their blogs, twitter, facebook, stumbleupon, wanalo ....etc etc .... The organisers are also promoting the event and all the participating artisans.  It is incredible really!
 
This will be my first experience of CRAFTfest and I am excited to see how it works and if I make any sales as a result of it.  I know one thing, I have been brought together with some amazing people and it will be great fun joining the team!  I am learning so much!  There is so much to learn!
 
Over the next couple of weeks I will be posting more and more about the CRAFTfest and if you have a few moments to click on my links and support my fellow artisans, we would all be really grateful.  If you want to support us by helping to promote CRAFTfest, that would be fantastic too! 
 
Support Handmade this Christmas and give your family and friends good quality, handmade items!


Sarah xx
www.beadscrumptious.co.uk
www.hypersmash.co.uk

Monday, November 12, 2012

Woman in Black Jewellery!


I wrote a blog post back in October called Woman in Black!  It was all about a set of lentil shaped beads I made after I had read the Novel - The Woman in Black by Susan Hill.  I know I am repeating myself here but if you get the chance to read it, please do ...... and if whilst reading you hear the wind howling outside, the windows begin to rattle and a very un-familiar creak on the stairs ........ don't worry ......

I decided to use the set of beads to make a bracelet.  Each lentil shaped bead was enclosed within sterling silver saucer beads.  Between each group of beads I added a 6mm swarovski crystal to add a touch of sparkle.  I finished the bracelet off with a sterling silver hallmarked lobster clasp.


I was really pleased with the result.  The beads became part of a very elegant piece of jewellery! I wanted to make more, a pendant maybe and a pair of earrings to match.  There was only one problem.  I had used up all of the beads.   

I couldn't decide whether to make a pendant or a necklace.   So the next day I made enough beads to keep my options open.  Of course, making the beads is only part of the bead making process.  I make each bead individually and once they are made I place them directly in my kiln.  They remain in the kiln overnight to anneal.  Basically, the beads are held at a certain temperature to 'soak' for a set period of time and then they are cooled down very slowly.  This gives the beads their strength and durability.  If I didn't place the beads in the kiln and just left them to cool in the open air, they would probably crack.  If they didn't crack immediately they would over a period of time.  Kiln annealing your beads is a very important part of lampworking.


When the kiln reaches room temperature the beads can be removed and are then soaked in water and removed from the mandrel.  I don't think I have mentioned the mandrel before.  Each bead is made on a metal rod called a mandrel.  The mandrel's have to be coated in a substance called 'bead release' before you start melting any glass on them.  The bead release does what it says .... you make the bead by melting the glass on the coated part of the mandrel so that when the bead is cool it can easily be removed.  If the glass was melted directly onto the mandrel without bead release then it would remain on there forever.  The photograph below is taken from my 'Shrooms Tutorial' but you can clearly see the metal rod (mandrel) and the light grey bead release.


Bead release is a nasty substance and it has to be removed from the inside of each and every bead.  For me, this is not the most interesting part of lampwork bead making.  I usually put on a good film and set about removing all the bead release from every bead.  I then give them all a good clean and polish on the outside so they are ready to be used.

It is quite a long process from start to finish and is usually why handmade lampwork beads are so expensive.

As soon as my beads were ready, I sat down with all my silver and threads (that would make a good name for a jewellery shop) and started making a pendant.


The pendant had to continue in the same theme as the bracelet .... obviously ... or it wouldn't match.  I strung one of the lentil beads onto a sterling silver wire core, I placed a sterling silver saucer bead either side of the lentil bead and finished it off with a 6mm black diamond swarovski crystal.  It looked unfinished at this point so I added a few little dangles on the bottom of the pendant to add interest and of course lots of sparkle ....

The set wouldn't be complete without a pair of lentil shaped earrings! I like making earrings! I added the same combinations of silver beads and swarovski crystals to create these .....


All of my lampwork bead jewellery can be found in my shop on Wow Thank you!


Sarah xx

Monday, November 5, 2012

Bubbling Brook!


This set of beads was great fun to design and develop.  I wanted to make some brilliant blue beads, filled with tiny bubbles of air that looked as though they were still bubbling away within the beads.  Sometimes most of the fun comes from researching and reading about how to develop an idea that has popped into your head.  There are times when ideas develop at the torch as you are making a bead but most of the time an idea requires a bit more research to find all the techniques that can enable you to achieve your design.

This is exactly what I did to develop this set of beads.  It was great fun!  I then put all the methods together made some beads and then tweaked these until I achieved the bead that was in my head.  This doesn't always work mind you....  There are too many times when you have a picture in your mind of how you want a bead to look and when you try to make it, it comes out like a chewed up toffee!

Usually I have already decided before I start making a set of beads if I am going to use them in a piece of jewellery.  But, this didn't happen with these beads and I have kept them in my bead box for quite some time,  until the other day when I stumbled across them. 

The beads are strung on a sterling silver wire core and separated by sterling silver saucer beads.  At the base of the pendant I have dangled three aqua coloured swarovski crystals which are strung on sterling silver headpins.  The pendant measures approximately 54cm including the dangling swarovski crystals and is strung on a 16 inch hallmarked, sterling silver curb chain.
This pendant can be found in my shop on WOW Thank You! - Beadscrumptious

Sarah xx

www.beadscrumptious.co.uk
www.hypersmash.com

Sunday, November 4, 2012

Bridgwater Carnival!


I live in a very quiet little village next to the town of Bridgwater.  It is also a fairly quiet little town but every November the town is buzzing with people visiting from all over the county to see the Bridgwater Town Carnival.  The largest illuminated carnvial in Europe! The atmosphere is electric in more ways than one!


It is a Spectacular, Spectacular illuminated carnvial of the most outrageous proportions.  We are talking about enormous carnival carts, brightly lit with hundreds of light bulbs, whizzing, twirling platforms, music blaring and energetic dancers putting everything into making the cart a visual delight.  It is something that really has to be seen to appreciate.


Unfortunately, I wasn't in the best place to take photographs but just to help you appreciate the enormity of this event ..... everything on this cart moved, span, jiggled and as you can see from the photograph was absoultely enormous!  There are hundreds of carts with the majority being of this scale!  


The town is divided by competing carnival clubs who work solidly all year and in secret to make these amazing carts.  Someone has to win each year and what a fantastic competition for all us to enjoy!
 
On our way back to the car we passed all the carts that had finished the procession so I couldn't help taking a photograph of the cart without any of the lights, music or dancers....


Please take a look at the offical website if you want to treat your eyes to a visual spectacle!


......I haven't even mentioned the Squibbing yet.... This happens after the carnival has finished.  The High Street is suddenly plunged in darkness and then lit up with what I can only describe as enormous sparklers!  


Wednesday, October 31, 2012

Sea Breeze!


This week I have continued to progress with my coastal inspired series of beads using new designs I developed whilst at the torch.  I wanted the designs to be more organic and to let the glass flow.  I have found that sometimes I become so obsessed with every dot being exactly the same size and shape and every design being practically perfect, that it can completely stifles any creativity.  So, for my new lampwork bead sets I have explored my creativity and have let the designs develop naturally!


I have really enjoyed making these beads.  Sometimes I think you have to just let yourself go and be free at the torch to express yourself without any constraints!  There are so many ideas whizzing around in my head as I am making these beads...it is fantastic!  The designs are endless, every bead I make is completely different and totally unique.  I do feel a little guilty about abandoning the polymer clay at the moment but I think some of designs may be transferable....


I need to make a few sets for my jewellery range.  I have so many ideas to explore further..... different designs, different colour combinations ..... the list is endless....

These beads can be found in my shop on Etsy - Beadscrumptious on Etsy!
It would be lovely if you took the time to have a look at my beads and maybe clicked a few of your favourites!  Thank you....

Sarah xx

Sunday, October 28, 2012

New Focal Beads!


Mystic


I have taken a little break from making bead sets to make a few focal beads.  These are always great for jewellery designers to create beautiful pendants, necklaces and sometimes additions to bracelets.  I must admit I was a little reluctant to part with this one because I can think of some lovely pendant designs for this bead but .... I have enough jewellery to finish at the moment and this bead deserves to go to a good home and not be waiting at the bottom of a very large pile of half finished jewellery.....

This is a hand formed focal bead, which basically means I didn't use a press to create the shape.  It was sculpted by me when the glass was molten.  The glass behaves almost like thick treacle when it is in this state and is great to sculpt into different shapes.  When it is cool and is removed from the kiln it almost retains it's fluidity even though it is now solid.  There are so many possibilities!

It is a very tactile bead and I have added some dots using a reactive glass on the surface.  The raised dots appear to change their colour in different light.  Which makes the bead quite interesting!


Mystic

This is the reverse side of the bead and as you can see it is very sparkly because I am having a love affair with pixie dust and have been adding it to everything lately!  It is coming up to Christmas after all!


Enigma

This focal bead is completely different.  It is another handformed bead.  This time I let gravity do all the work to make the sleek, smooth shape of the bead.  I only used two different colours of glass to make this bead and yet it is looks like I used many different colours.  This is due to the reaction that ivory glass has with many different colours and with how much heat is applied to the glass.  I love the deep, dark swirl of glass in the middle of the bead.  It looks like a mysterious cavern! 


Enigma

When I started making the bead I kept the ivory coloured glass and turquoise separate and then whilst the glass was molten I swirled the colours together and let gravity shape the bead and mix the colours around further.  It is quite effective!

This would be ideal as a focal bead for a pendant.  It would look very dramatic, strung onto a solid core with some sparkling swarovski crystals to bring out the accent colour of turquoise.  I have used these beads in the past to create some very beautiful pendants.

Green Dragon

If you would like to know more about my two focal beads - Mystic and Enigma. They can be found in my shop on Etsy - Beadscrumptious on Etsy!

If you like them, I would be really grateful if you added them to your favourites!

Sarah xx

www.beadscrumptious.co.uk
http://www.hypersmash.com

Tuesday, October 23, 2012

Lots and Lots of Christmas Sparkle!


Sparkly Christmas Heart
Over the last couple of days in between making beads, cleaning beads and making more beads, I have also been making jewellery using my very own handmade lampwork beads. 

It all started when I discovered this beautiful red transparent glass lurking at the back of all my glass rods.  I was looking for a yellow/straw coloured glass which is the colour of this glass before it has been heated in the flame.  Once you start to heat the glass, it changes colour (or strikes) to a beautiful bright red.

I sculpted the heart from molten glass, using gravity to help me gain the 'heart' shape then pulling and twisting the glass to create the swirls on the surface of the heart.  I also added a wisp of silvered ivory stringer that I swirled around the base of the heart.

Whist I was making the heart I already had an idea of how I was going to turn it into a pendant and because it was a beautiful bright red I knew it would make a perfect Christmas gift.  So, out came the sterling silver beads, the swarovski crystals and turned them into the Sparkly Christmas Heart.


Sparkly Christmas Bracelet
I liked the glass so much I decided to make some more beads but this time round ones!  I added a ring of silvered ivory stringer around the middle of the beads so they would match the heart. 

As you can see in the photograph above, I used these beads to make a Sparkly Christmas Bracelet.  I couldn't decide whether to have dangling swarovski crystals like the pendant or to use larger crystals to separate the beads.  I tried both and decided the bracelet looked better with larger 6mm swarovski crystals sitting in between sterling silver saucer beads. 


Sparkly Christmas Earrings
I couldn't make a pendant and a bracelet without making a pair of earrings to match.  The earrings also featured as Week 20 in my 52 earrings in a year challenge.

I used two smaller beads to make the earrings and strung them onto sterling silver headpins.  I placed the beads onto a swarovski crystal and finshed them off with a sterling silver saucer bead and a cluster of swarovski crystals topped with a sterling silver rondell bead.  Perfect for some Christmas Sparkle!

My jewellery is available in my shop on WOW Thank you!

Sarah xx
www.beadscrumptious.co.uk

http://www.hypersmash.com
Hypersmash.com