Showing posts with label flowers. Show all posts

Friday, February 8, 2013

The Monday Glass Challenge


Back in 2012, I started the Monday Glass Challenge to ensure that I would always have an idea lurking in the back of my mind in case I had a lampwork block. This is very similar to a writers block...... That hideous moment when your mind goes blank and you can't think of anything to make.

I found this worked well for me and usually ideas came from ideas, my brain would start whirring and before I knew it my head would be exploding with inspiration. For some ghastly reason this has a tendency to occur when I am just about to go to sleep. But as any artist knows ... you have to make the most of these moments ... there is always a sketch book close by!

This year I have decided to modify the challenges slightly and include an .... "Inspiration of the Week". As I have already mentioned sometimes ideas perpetuate even more ideas and your brain is doing somersaults trying to keep up with the synaptic overload! I don't want to lose this and when it happens I intend to take full advantage. Sorry to all my Facebookers and Twitterers but I will be bombarding you with my ideas too ... (and yes I know Twitterers is not a real word .... ).

I have had a slow start to January 2013 for lots of reasons that I won't bore you with (reading the Life of Pi ..... very good book ... may have contributed to this ..... a little .... ) and I didn't have the opportunity to start the Monday Glass Challenges until this week ..... Is it really February already? Now I am feeling very lazy! I am now back to work properly and ready to go!

This inspiration for this week was - Beautiful Flowers and lots of bright colours. The Monday Glass Challenge was to make sets of Floral Beads ... of course! It didn't go entirely to plan because my brain wasn't connected properly to my hands and they wouldn't do what they were told so I had a few disasters. Also, I couldn't get the colours quite right so I am going to have another go later and will add the photos to this blog.

I am wondering whether the inspiration should be a monthly thing, rather than weekly to give me the chance to explore all the creative options available ..... what do you think? I'll see how it goes, perhaps it will run over more than one week .... I like to keep my options open. Keep an open mind and all that .....

Anyway, I am rambling again .... If you would like to participate in my inspiration ideas or challenges it would be a pleasure to have you along what can be a very lonely road at times. I would love to see and share your makes too. Here are some photographs of some very pretty flowers (all taken by me) to give you some inspiration ..... if you care to join me .....


Here are some of the floral beads I made on Monday!


Sarah xx
www.beadscrumptious.co.uk
www.hypersmash.com

Monday, January 21, 2013

Monthly Make - January 2013


Many times I have recieved a compliment about my work followed by .... "...but what would I do with those beads?......"  So, I have decided to start a new monthly blog called the Monthly Make.  In  this I will challenge myself to find a way of using my beads .... This challenge will not include using my beads for jewellery but other ways in which my beads can be used!

Ok, so here goes ........

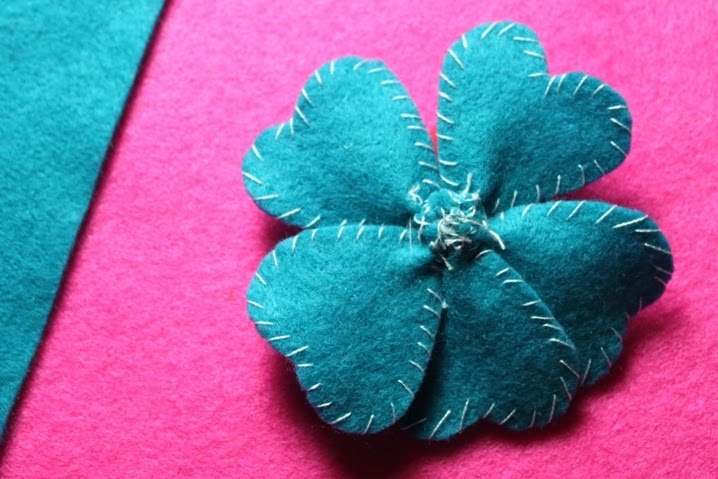
Felt Flower Brooches!

1.  Make yourself a card template in the shape of the petal that you would like. As it is coming up to Valentines day I decided to make a heart shaped petal but you could have round, oval, triangular or something more elaborate.  There are many, many options.  I also made a large and a small template for different sized petals. Then, using your templates cut out 5 large petals and 3 small petals (or as many as you would like).


2.  This is where you can let your creativity flow and decorate the edges of your petals, add sequins ... embroider flowers, make them as pretty as you like or just leave them plain and simple.  Both can be equally as effective!  I like to stitch around the outside of my petals in a contrasting colour.


3.  Once your petals are ready, it is time to construct the flower.  This bit can be a little fiddly .... or it may just be me!  You are trying to achieve a little pucker when you gather all the petals together.  The way I do this is to do a running stitch through the base of each petal and then carefully pull them all together into a bundle.  When I have them all arranged the way I want them, I securely stitch all the petals together.


4.  Repeat step 3 with the smaller petals. Then stitch these into the centre of the large flower.


5.  We are now in a position to decorate the centre of the flower.  I had a quick look through my bead box and found this very lonely purple lentil bead.  I like to clash my colours!  I stitched the bead into the centre of the flower.  The orientation of the bead will depend on the surface decoration.  I have used one of my implosion beads in the first photograph and I finished this off with a tiny seed bead to cover the bead hole.  I have placed the purple lentil bead on it's side so the bead hole isn't visible.


6.  Now, depending what you want to use your flowers for, you may/may not want to add a brooch pin.  I must confess that I am not a very neat sewer as you can see from the photograph below .... So, if I wasn't going to add a brooch pin I would hide this by gluing a red circle on the top using my glue gun.  If I was going to add a brooch pin I would sew it directly onto the flower.  I would then open the pin and attach a patch of felt over the back of the brooch pin.  It finishes the flower quite neatly!


I hope you enjoyed reading this post and if you have a go .... I would love to see your flowers!

Sarah xx
www.beadscrumptious.co.uk
www.hypersmash.com

Monday, June 25, 2012

Floral Beads - The Development of the Stamen!

I am always striving to improve my beads and to find a new challenge!  I can't help myself my brain is always working ahead of me on the next bead or next project and for a long time I have had this niggle in the back of my mind .... "why not add stamens to my floral beads?" 

Whilst they look pretty and almost like trapped flowers with the plunged dot in the centre, they would look much more realistic with stamens!  So, my brain goes off into over drive .... how can this be achieved ...... and I find myself turning into an amature botanist examining and photographing every flower I see .....


The stamen is composed of two parts; the big orange (in this case) furry bit at the top called the anther, which is responsible for producing pollen and the long slender stalk called the filament, at the base of which can be found nectar.  The stamen is the male reproductive part of the flower and the large protuberance in the middle is the female reproductive part of the flower called the carpel (pistil).  This consists of the stigma which is at the tip, then the style and the ovary at the base.  Ok .... biology lesson over ..... so how do I incorporate this into a bead?


This was the tricky part .... I decided to start off simple and made a very simple cane using opaque yellow glass encased in clear.  I made these into stringers and aligned them horizontally on a clear rod.  I encased the cane in clear again and pulled this into a stringer.  The development of the anther would have to be a project for for another day!

I decided to keep the flowers simple too (little white petals) and concentrate only on the stamens.  Now, I know this photograph isn't brilliant but I found it difficult to see the stamens, they were too small and spindly(maybe the cane was too thin).  Annoyingly, I kept trapping bubbles of air between the outer encasing layer and the stamen which also made them difficult to see.  So, I go back and study a few more flowers for some ideas ....


I made a more complex cane based on the Choisya flower in the photo above.  I decided to attempt multi-layering the cane by alternating a layer of orange with yellow and white encased canes.  If I hadn't of been so heavy handed with the white cane then I think this may have been more sucessful!  


This bead was a total disaster!  I thought I would try and be clever and make a Geranium bead.  Quite a few things went wrong here.  The number of petals was my first big mistake!  They don't look too bad in this photo, but throughout the bead I had stray petals that didn't look as though they belonged to anything.  I made these stamens using a simple cane - brown glass encased in clear, pulled into fairly thick stringers and then placed horizontally on a clear glass rod.  I added multiple layers of brown cane separated each time with a layer of clear.  Again they looked a little spindly to me!

There must be a way to make the stamens stand out more? ...... Perhaps if I add a white dot to the centre of the flower and add the stamen cane on top of that ...... no!  I think I made an even bigger disaster with this bead .... still this is a good way to learn .... I suppose .... and practice makes perfect!  haa haa!  Sometimes, quite by accident you can stumble across a new idea .... if I develop the centre of the bead further (forget adding petals) I will have the start of a Lily. 


This was my final attempt at stamens!  I went back to the simple yellow glass cane, used larger stringers and multi-layered this onto a clear glass rod encasing each layer in clear glass.  Finally I pulled all of this into a fairly thick stringer and used it to create my stamens.  I am happy with these for now!  I just have to perfect my technique so that all my flowers are consistent.

Well ..... there is still this niggle about the anther's .... oh and having the same number of stamens as petals!


Sarah xx


Monday, February 27, 2012

I'm in Floral Heaven!

I was walking back home after dropping my children off for school and saw these beautiful flowers in one of my neighbours gardens.


Having a camera phone does have it's advantages! Anyway, my little brain started whirring and I thought "That would make a lovely floral bead!" I came home, made a cup of tea and walked up to my shed/studio/shed to see what glass I had.

As I haven't made a sucessful floral bead before I though I would keep the first one quite simple.  The first thing to do is to make lots of stringer in the desired colours.  So I pulled some white, blue, periwinkle, green and transparent turquoise stringers.  I found some clear glass rods, green frit, put on the radio and set to work.  Here is the result....


It took a long time to make but I was so pleased with the result!  The last time I attempted a floral bead I just ended up with random blobs of colour all merged into one mess inside the bead.  It was a hidious sight which I made worse when I tried to encase the bead.  That one ended up straight in the flower bed so I can't show you how far I have come since then.  I have learnt from speaking to fellow lampworkers what my mistake was and how to stop all the colours from bleeding into one another.

The trick is lots of encasing! This bead was made as follows..... I made a small barrel of clear and rolled it in green frit.  Then I covered the frit with a thin layer of clear.  I added my green stringer to mimic leaves and encased this in clear.  Next I randomly placed tiny dots for the flower petals in sets of three.  I melted them in and added transparent dots on top of the previous ones to give the petals some depth.  This bit is quite tricky....  I spot heated each set of dots and plunged a pick in the center to create a tiny hole and then covered each flower with a blob of clear.  This is to trap a bubble of air in the flower.  The final stage was to add another layer of clear to the whole bead.  Round it up in the flame and place in the kiln.  Success at last!

This spurred me on to try making a set of beads with purple flowers.  My original idea! Yipee! I get to use CIM Lapis AGAIN!.... I am slightly obsessed with this colour at the moment.  It is such a lovely glass to work with and gives you a really deep, rich purple.  I also decided to make some green cane that looked more like a leaf.  This was a little more time consuming because I had to stripe black stringer onto a green glass rod, cover it in clear and then pull it into a stringer.  Here is the result.....


However, as usual I want to run before I can walk.  I am never satisfied unless I am stretching my abilities to their maximum.  "How about adding multiple layers of flowers?" I thought to myself...... even more encasing, and heat control!  A challenge .... but I did it!


If you look very closely, you can just see the little blue flowers beneath the purple ones.  They look like the ghosts of flowers peeking through....

Still I feel I could stretch myself further.  My mission for this week is to add stamens to my flowers.  This will mean making more cane, experimenting and a bit trial and error.  I look forward to posting the results soon.....
Hypersmash.com