Showing posts with label polymer clay earrings. Show all posts

Wednesday, July 25, 2012

Hectic Week!


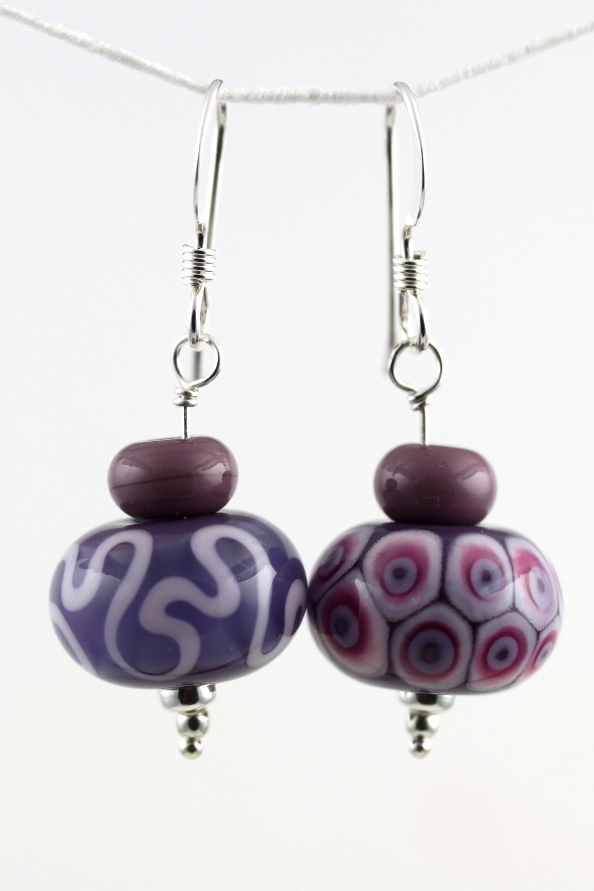
It was completely manic last week with all the end of term activities for the kids but I still managed to squeeze in my earrings for Week 14.  I completely confused myself over what week it was too.  For some reason I had two entries for Week 8 ...... I am going bonkers!

I made the beads for these earrings quite a long time ago and had completely forgotton about them until the other day when I found them lurking at the bottom of my bead box.  I can remember why they ended up there.  To be honest, I wasn't sure what to make with them and if I really liked them.

This has happened quite a few times.  I have had an idea for a set of beads and made them but they haven't quite turned out as I had imagined.  Now, this doesn't mean that they aren't very nice beads but when I am in the 'creative zone' they end up being put to one side whilst I concentrate on getting the design exactly the same as the image in my head.

I always keep these bead sets because I know from experience that in a few months/weeks time, I will look at the beads and see them completely differently.  Or they will become the spark of inspiration for a piece of jewellery.

Sarah xx
HyperSmash

Sunday, July 15, 2012

Love Flies!

Week 12 - Love Flies
Hello,

I just wanted to write a quick blog to show you some of the earrings I have made as part of the 52 earrings in a year challenge!  In my next blog post I will show you how I made my Pluto pendant into a necklace ... I promise!

Here are a few more pairs of earrings that I haven't included in my blog posts so far .....


Week 10
I decided to have a break this week from polymer clay and make some earrings using my own lampwork beads.  


Week 9

I made my own flower cane for these earrings and I do have a half finished pendant to add as well.  I was really pleased with these, especially considering I am quite new to polymer clay.

Have a great week!   My next blog post will be coming soon ....

Sarah xx


Hyper Smash

Tuesday, July 10, 2012

I love you to the pluto .... and back!


I have been very busy over the last couple of weeks designing and making this pendant.  I have had the idea for a long time and I have to say I am really pleased with the result.  It looks exactly like I imagined it would ... which doesn't always happen, believe me!

Anyway .... where did this idea come from?


Source: amazon.co.uk via Sarah on Pinterest

When my eldest son was a toddler he used to love it when we read, Guess how much I love you by Sam McBratney.  It is a lovely story about a little Nutbrown Hare competing with Big Nutbrown Hare over how much they love each other.  On one of the pages little Nutbrown Hare opens his/her arms as wide as they will go and says "I love you this much" so big Nutbrown Hare opens his/her arms wider and says "I love you this much".  Little Nutbrown Hare replies with "hmm that is a lot" and so the story continues until little Nutbrown Hare says "I love you right up to the Moon!" and Big Nutbrown Hare says "AND BACK!".

So, one day I was reading this to my son and (typical of him) he says very smugly "Well, I love YOU to Pluto!".  You can guess what my answer was .... "Hmm that is a long way ... I love you to Pluto and BACK!"   This has always been our special joke and now he is growing up (too quickly), I wanted to capture that memory in a piece of jewellery.

I have tried before ... Last Christmas my husband bought me some Precious Metal Clay and I decided I would use the clay to make three silver charms that would remind me of my three children.  I started with this idea and made a silver pendant in the shape of a heart with "to Pluto" written on it.


Whilst I enjoyed making it, there was something missing.  It was far too plain and didn't represent all the fun and giggles we had with the story.  So, I put the idea to the back of my mind until a couple of weeks ago when I was sat doodling on a scrap of paper.  Suddenly the idea emerged into this design!


I hadn't thought of using polymer clay before and with a few tweeks to my original design the pendant took shape.  I know, just in case there are some planetary boffins out there that Pluto isn't really this colour but I think I can excuse myself and use my artistic licence to change things around a little.  I wanted the pendant to be bright, bold and lots of fun! 

I definitely think I have captured the memory for my son because when he saw the pendant (and I didn't say anything ...) his face filled up with an enormous beaming smile, he grabbed hold of me and gave me the biggest huggle EVER! There were no words!

I have been asked a few times, how to turn my beads into jewellery.  So,  in next weeks blog post I will show you (with lots of photos) how I have made this into a necklace ... or a piece of "wearable art" as Chrissie would say. 


My youngest son likes the story about Aliens in Underpants!  Not sure how I am going to do this one yet!

Ooops nearly forgot ... the earrings to match!


www.Hypersmash.com

Sunday, June 17, 2012

Barrington Court - Antony Gormley Inspired!


The inspiration for these earrings came from a trip to Barrington Court to see Antony Gormley's installation called "Field for the British Isles". The installation consists of 40,000 clay figures that had been meticulously laid out in three rooms completely filling the room so that no floor could be seen.  It was very impressive and it looked like there were thousends of little tiny people looking at you.  They were laid out so that the eyes of each figure faced the front and the figures closer to the front looked up towards the ceiling.  Very effective!  They were all very individual, different shapes, sizes and colours.  I wish I could of taken some photos but we were not allowed.  If you click on the link above you can view some of the official pictures.

The clay figures were quite small and had been made by a group of families in St Helens near Liverpool back in 1993.  Antony Gormley used the figures to completely fill the floor of one of the exhibition rooms at the Tate Liverpool in 1993 and as a result won the Turner Prize in 1994.  He is also very famous for the 'Angel of the North'.

According to the National Trust article Antony Gormley said: “ .....The instructions to create the work are very simple. You sit on the floor. You take a ball of clay from a pile. With your clay, you create a “body” in the space between your hands. You allow it to stand up, and make it conscious by giving it eyes with the point of a sharpened pencil. That repeated action of taking a hand-sized ball of clay, squeezing it between your hands, standing it up and giving it consciousness becomes meditative, the repeated action becoming almost like breathing, or a heartbeat.”

Well, knowing I had a pair of earrings to make for the 52 earrings a week challenge, I had to have a go!  But I wasn't alone making the earrings this time ..... my family had a go too.  It was great fun and my children loved it!  So I mixed three batches of clay in three slightly different colours and we each had a go at making our own clay figure.


We had such a lovely day visiting Barrington Court (and I am very sentimental) I decided to turn our figures into a necklace to keep as a memory of our day.

Sarah xx

Monday, May 28, 2012

Crumpled - Week 6 of the Challenge!

I need to start this week's blog by going back to Week 5 of the 52 Earrings in a Year Challenge... I wasn't very well last week (still not feeling too good mind you) and didn't have the chance to get my earrings made in time....so I will briefly mention them now....

I actually started Week 5 with an idea for a pendant.  With all this lovely weather I have gone back to a beach theme and being a Geologist, whenever I think of the beach...I think fossils....Ammonites!  So, I decided to make a jellyroll cane that looked 'kind of' like an Ammonite.  I made it using green, blue and black clay but found that it was too dark.  It definitely needed brightening up!  I tried to achieve this by wrapping multiple layers of 'brighter colours' around the cane and ended up with this.....


I really liked the style of pendant I had made earlier in May for The Beach, and decided to make a similar one using this cane.  I wanted to make a bright, bold pendant that would really catch a person's attention.  Hopefully I have managed to achieve this.....

I was going to cut a slice a cane with the Ammonite spiral in the middle and then make this into a pair of earrings but it didn't look right.  So I ended up taking slithers of the cane and placing them onto a sheet of clay.  Putting this through the largest setting on my pasta machine and the cutting out random circles until I found the 'one'.  I think this worked better....


Now onto Week 6.....

I am not sure what has been going on in my head this week (other than trying to fight off a nasty case of the flu) ... but I made these...


The idea just sprang out of nowhere!  I was happily chopping out rectangles of stripey clay and randomly decided to crumple them up! It was almost impossible to make the crumples symmetrical but I did have a good try....  After they had been cured and sanded I noticed the thin turquoise strip running down the length of the bead.  I decided to accentuate this with a strand of a very vibrant turquoise Tiger Tail and some seed beads.  I wanted to liven the beads up, bring out some of the colours and make them a bit more funky! 

Of course......I can't make earrings without making a pendant to match......


I am essentially a lampwork glass artist but I am really enjoying this challenge because it is giving me a chance to work with Polymer Clay and I am learning so much.  I think it will be interesting in a year's time to see if/how much I have progressed.

Sarah xx 

Monday, May 14, 2012

Week 4 - MonSwirl Earrings!


This week I decided to use the two swirl beads I made last week out of Stroppel Cane as my earrings for Week 4.  I made these beads using a Stroppel Cane.  The idea was invented by a lady called Alice Stroppel. Now, I had no idea this technique even existed until I was taught by Cara Jane during one of her clay days.  Cara told us all about Alice and how this was a great way to use up all of your clay odds and ends.  The effects are fantastic and now I can't stop using it!


The colour combinations I have used here put together within sandwiches of black clay really remind me of a chewed up Mondrian - hence the name of the earrings .... MonSwirl!

I did make a necklace as well this week but not out of the same cane as the earrings.  I have yet to finish that pendant (above).  I decided to use the heart pendant I had made using the same Stroppel Cane as the earrings.  It was Caroline Casswell who taught me how to make heart pendants. 

I started by making an oblong out of some 'left over' pink clay and added very think slices of the cane.  Then I turned this into a pendant.  I was really pleased with the finished result, especially after sanding and buffing.  It really helped to accentuate the colours. 


I added some more cane to a flat sheet of pink clay and put it through the thickest setting on the pasta machine.  Then I cut out 4 circles.  I was going to leave them as circles, then for a reason unknown to myself, I decided to distort them slightly.....and this was the finished result..


Sarah xx


Sunday, May 6, 2012

The Beach


I don't know why but I love visiting the coast when it is pouring with rain and blowing a gale.  I don't think you can beat that feeling when you step out into the fresh salty air struggling to walk against the wind, the sea spray stringing your face and hearing the sound of the waves pounding against the rocks.  It is very invigorating!

My children LOVE the beach.  They love just being able to run along the sand, splash in the water and collect every single shell off the beach.  I mean EVERY single shell......mind you....who doesn't?  My husband is just the same...my poor little rucksack was full to the brim of salty, sandy shells.....but what inspiration they all found.....


I was absolutely captivated by these Limpet Shells with the abandoned remains of the Barnacles looking almost sculptural on the surface.  A piece of art in itself!
Now, sometimes I make things without consciously thinking about where the inspiration has come from.  Obviously I have been inspired by something that I have seen but I haven't realised that until I have finished the piece of work.  Does that make sense?

I sat down at my bench with all my clay thinking about what I was going to make for week 3 of the 52 Earrings a Year challenge (52 Earrings in a Year). I knew I wanted to make some bright and happy earrings this week because the weather has been so miserable I thought it would be good to bring a little 'summer' into my work.  I picked three very bright colours .... turquoise, mint green and lilac.

But what to do with these colours......I decided to make a Skinner blend using the turquoise and a little white but I deliberately didn't blend it in perfectly as you will see.  I rolled this up into a jellyroll cane and even though I covered it with black clay it still didn't look finished.  So I took the mint green and lilac clay and made a striped cane and wrapped this around the jellyroll, added another covering of black and was much happier with the result ....much better I thought....


As you can see from the picture I made a flat sheet using the remains of the Skinner blend.  I reduced the finished cane, cut thin slithers and added them to the sheet.  I put the whole lot back through the pasta machine on the thickest setting and cut out a round pendant.


Without consciously realising it I had taken the idea of the Barnacles and used this as the main theme for my pendant.....and my earrings for week 3.....because of course you need matching earrings!  Thank goodness I haven't started making bracelets too.....this could end up becoming 52 jewellery sets in a year!


I made some nice big round beads using the cane and decided to string them all onto black suede for a contrast to bring out the turquoise in the beads.  I do like a sparkle....so I also added a wrap around of pale blue seed beads almost mimicking a trapped fishing line glistening in the water....

....and of course my earrings for week 3.......


Sarah xx

Sunday, April 29, 2012

Week 2 - 52 Earrings a Year!

I was going to make a really bright, happy pair of earrings for the challenge this week as retaliation against the miserable weather we are having.  It feels as though it has rained forever and somewhere above those grey clouds is a hot, yellow sun basking in a brilliant blue sky....hopefully this week we will get to see it!

Despite the weather I had a fantastic day on Wednesday meeting with some lovely polmer clay artists ( The not so lonely life of a bead maker..) and was truely inspired by everything I had learnt.  The next day, rather than spend my time making glass beads, out came the pasta maker, clay and away I went.....

I started off with the intention of making a Mokume Gane pendant/earrings...bear with me... (a technique I learnt on Wednesday).  I prepared my sheets of different coloured clay and stacked them on top of one another put them through the pasta machine and repeated several times.  Then I imprinted the surface using my flower stamp...


Then I changed my mind....I couldn't help but think this would make a lovely pendant just as it is! I chopped the rough edges off and cured the pendant. 

The colours I had originally chosen (Alizarin and Gold) blended into a deep red/bronze colour which because of the gold, looked metallic.  I decided to cut thick slices of clay and wrap them around each other leaving the edges rough so that they would look rustic and slightly industrial.  You can just see them at the back of the tray. 


After making these 'industrial' beads I mixed yellow, turquoise and silver to make a silvery green colour.  I wanted to make some tiny leaves to compliment the flower prints on the pendant. To make them I cut out some small circles and gently pinched two sides together and using a cocktail stick I made veins on the leaves...


To finish the pendant I made two borders using the colours I had chosen for the beads and thread them all on green and olive silken thread.


Now all I needed was a pair of earrings! I know this is a very long-winded way of explaining how I reached this week's design for earrings but I needed to make a pair to match the pendant.  I used the rustic beads and strung them on brass headpins.  I was going to add some leaves to the top bead but it really didn't look right....

Sarah xx


Sunday, April 22, 2012

52 Earrings in a Year Challenge!

I feel as though I have been away from my blog for ages ...... I have been incredibly busy lately catching up with a million and one things I had put aside to make beads.  Then I ended up in that vicious cycle where I couldn't concentrate on beads until I had sorted out all the other things....but enough of my gibberish....

I actually started this challenge two weeks ago after reading Chris Pellows Musings and following Cara Jane but rather than try and catch up I thought I would start it fresh today! The challenge was started by Anke Humpert at Anart Island Studios to make a pair of earrings for each week of the year.  This is my week one.....


I made these earrings using a Klimt cane, the first one I had ever made. So I was very pleased with myself.  I used Premo Sculpey Clay (not glass this time), Gold, Alizarin and a pale green that I made myself from mixing colours.  The gold has given the surface a nice pretty sparkle but unfortunately I rushed taking the photo which I slightly regret now because you can't see the sparkly bits sparkling in the beads....oh well....

Sarah xx

    Hypersmash.com